New to online business? Start with our free 7-day roadmap and build your foundation step by step.
Get the Free Roadmap →Ecommerce
How to Take Product Photos for an Online Store
How to Take Product Photos for an Online Store
A customer shopping online can’t pick up your product, turn it over in their hands, or check the stitching for themselves. Photos are doing all of that work instead — they’re the closest thing to a physical inspection your buyer gets before deciding whether to trust you with their money. Which is exactly why learning how to take good product photos for an online store matters so much more than most beginners initially assume, and why it’s worth getting right before you worry about anything else on the page.
This guide covers exactly how to take product photos for an online store that actually help you sell — no professional studio or expensive camera required to get started, just a clear understanding of what actually matters and what doesn’t.
Why Product Photos Matter More Than You’d Think
Before getting into technique, it’s worth understanding why this specific detail carries so much weight. In a physical store, a customer’s senses do a lot of the trust-building automatically — they see the texture, judge the size against their hand, notice the quality up close. Online, photos are the only substitute for all of that. Blurry, dark, or inconsistent product photos for an online store create doubt before a customer even reads your description, no matter how good the actual product is.
What You Actually Need to Get Started
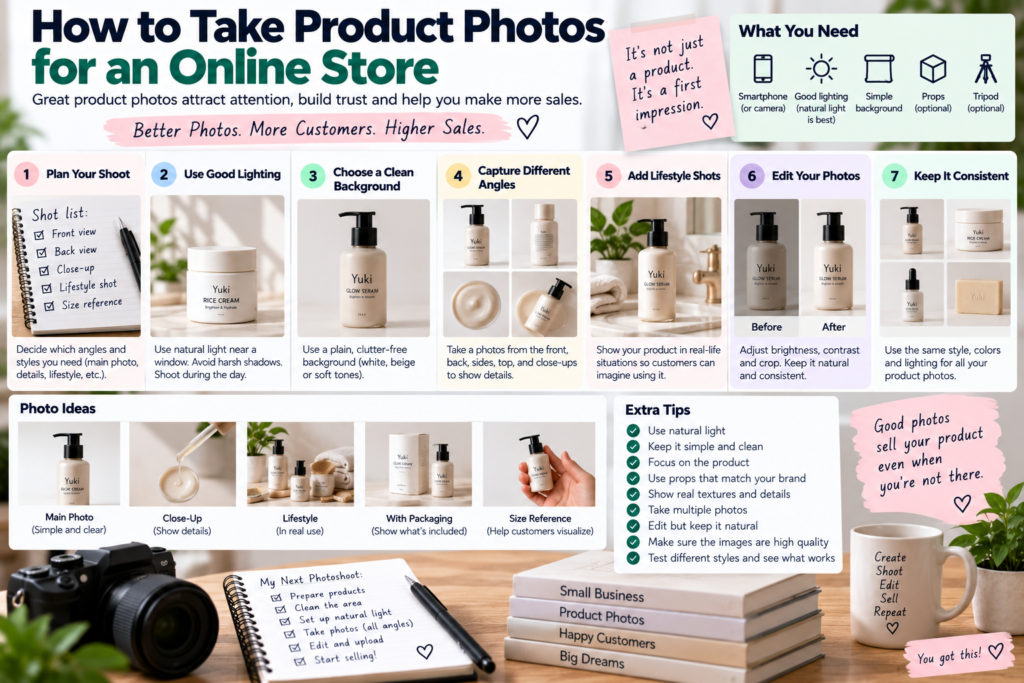
Contrary to popular belief, you don’t need professional equipment to take solid product photos for an online store. A realistic starting kit includes:
- A smartphone with a decent camera — most phones from the last several years are genuinely capable
- A simple lighting setup — natural window light works well, or an inexpensive ring light
- A plain background — a white sheet, foam board, or a dedicated photo backdrop
- A tripod or stable surface — to avoid blurry shots from handheld shake
Upgrading to more advanced equipment can come later, once you understand what’s actually limiting your results.
Lighting: The Single Biggest Factor
More than any other variable, lighting determines whether your product photos for an online store look professional or amateurish. A few practical guidelines:
- Natural light near a window is often the easiest, most flattering option for beginners, especially on an overcast day when light is soft and diffused
- Avoid direct, harsh sunlight, which creates strong shadows and blown-out highlights
- Use multiple light sources if shooting indoors artificially, to avoid one-sided, uneven lighting
- Stay consistent across your whole catalog — mismatched lighting between products creates a disjointed, unprofessional-looking store
Choosing the Right Background
A clean, distraction-free background keeps attention on the product itself. Pure white is the most common choice for ecommerce, partly because many marketplaces (Amazon included) specifically require it for primary listing images. That said, a lifestyle or contextual background can work well for secondary images, showing the product in actual use rather than isolated on a blank surface.
Angles and Coverage: Show the Whole Story
A single photo rarely tells a customer everything they need to know. Aim to include:
- A clean front-facing shot on a plain background
- Multiple angles (side, back, top) depending on the product
- Close-up detail shots highlighting texture, material quality, or specific features
- A scale reference, if size isn’t otherwise obvious
- A lifestyle or in-use shot, showing the product in a real-world context
More coverage generally reduces the number of pre-purchase questions you’ll field and lowers the odds of a return based on unmet expectations.
Editing: Enhance, Don’t Deceive
Basic editing is expected and generally beneficial — adjusting brightness, cropping consistently, and correcting color accuracy. Free tools like Canva or GIMP handle most of what a beginner needs without requiring a paid subscription.
The line worth respecting: editing to make a photo accurately represent the product is fine; editing that misrepresents color, size, or condition tends to backfire hard, generating returns and negative reviews once the real product doesn’t match expectations.
Consistency Across Your Whole Catalog
One overlooked factor in product photos for an online store is consistency — matching angles, lighting, and background style across your entire catalog creates a cohesive, professional impression, even if individual photos aren’t studio-perfect. A store where every product looks like it was photographed differently reads as amateurish, regardless of how good any single photo looks in isolation.
Photographing Different Product Types
Not every product photographs the same way, and a few categories deserve specific mention:
Clothing and apparel — flat-lay shots work for budget-conscious sellers, but photos on a model or mannequin tend to convert significantly better, since they help customers visualize fit and scale.
Small, detailed items (jewelry, electronics) — macro or close-up shots matter more here than for larger products, since customers need to evaluate fine details that a standard shot might miss entirely.
Products with texture (fabric, food, ceramics) — angled lighting that creates subtle shadows can highlight texture far better than flat, direct lighting, which tends to wash detail out.
Products sold by size or scale — including a reference object (a coin, a hand, a ruler) in at least one photo prevents the common customer confusion of misjudging actual dimensions from a photo alone.
Product Photography for Different Platforms
Where you’re selling can also affect what your photos need to look like. Marketplaces like Amazon have strict primary-image requirements (pure white background, product filling most of the frame, no added text or graphics), while your own independent store gives you more creative freedom for lifestyle shots, styled flat-lays, or branded backgrounds. If you’re planning to list on Amazon specifically, our guide on how to start selling on Amazon covers image requirements in more detail alongside the rest of the listing process.
Common Mistakes to Avoid
Inconsistent lighting between products. Creates a disjointed, unprofessional feel across your store.
Too few angles. Leaves customers guessing about details that could easily have been shown.
Cluttered or distracting backgrounds. Pulls attention away from the actual product.
Over-editing. Misrepresenting color or size leads directly to returns and damaged trust once the real product arrives.
Ignoring mobile display. Most shoppers browse on phones — check how your photos actually look on a small screen, not just a desktop monitor.
A Simple Beginner Photo Setup
If you’re starting from scratch, here’s a realistic, low-cost setup:
- Find a spot near a large window with indirect natural light
- Set up a plain white or neutral background (poster board works fine)
- Use a tripod or stable surface to avoid blur
- Shoot multiple angles and at least one close-up detail shot
- Lightly edit for brightness and consistent cropping before uploading
This costs very little beyond the time investment, and it’s enough to produce genuinely usable product photos for an online store while you’re still validating demand.
When to Invest in Professional Photography
As your store grows, professional photography can become worth the investment — particularly for hero/flagship products, or once your budget supports it. A professional photographer brings equipment, lighting expertise, and editing skill that’s harder to replicate as a beginner, though it’s rarely necessary to launch with. Many successful stores start with smartphone photography and upgrade later, once revenue justifies the added cost.
How Photos Connect to Building Customer Trust
Good product photos are really one piece of a larger trust equation. Combined with clear policies, genuine reviews, and a professional-feeling site overall, quality imagery helps convince a stranger to actually complete a purchase. Our guide on how to get visitors to trust your website and buy covers the broader picture of what builds that confidence beyond just the photos themselves.
Frequently Asked Questions
Do I need a professional camera to take good product photos? No. Modern smartphone cameras are capable of producing genuinely usable ecommerce photos, especially with good lighting and a stable shooting surface.
How many photos should each product listing have? Most ecommerce best practices suggest at least 4-6 images per product: a clean front shot, multiple angles, a close-up detail shot, and ideally a lifestyle or in-use image.
What’s the most important factor in product photography? Lighting consistently has the biggest impact on how professional a photo looks, often mattering more than the camera equipment itself.
Should I hire a professional photographer when starting out? Not necessarily. Many successful stores start with smartphone photography and quality lighting, upgrading to professional photography later once the business has grown enough to justify the cost.
How do I keep my product photos consistent across a growing catalog? Set up a repeatable process — the same lighting setup, background, camera distance, and angle sequence for every product — and stick to it. Writing this down as a simple checklist makes it easy to maintain consistency even as someone else eventually helps with photography.
1 thought on “How to Take Product Photos for an Online Store”
Comments are closed.
[…] photography feels like the weakest part of your preparation, our guide on how to take product photos for an online storecovers exactly how to get genuinely usable results without expensive […]